1. 发现问题
两年前就把我的 hawu.me 开启了 https,用的 Let’s Encrypt 的免费证书。但因为只是自用,而且由于墙的原因,从来没有留意过加载速度慢的问题。今天特意观察了一下,初次打开网站居然要耗时4、5秒,这还不包括加载资源的时间。
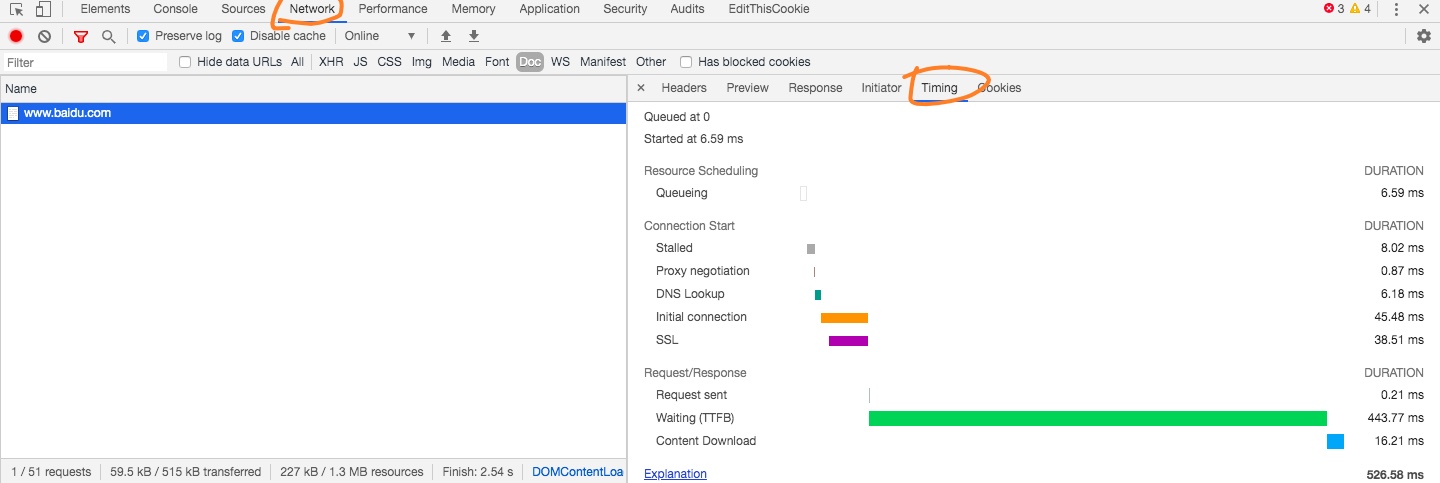
使用 Chrome 的开发者工具看了下耗时:
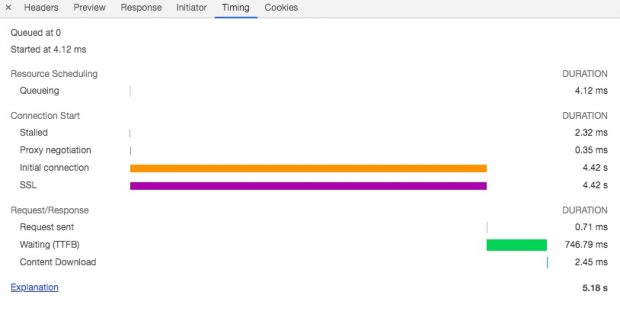
在初次建立连接的时候,Initial connection 与 SSL 时间居然都用到了4秒 (\”▔□▔)汗。Chrome 开发者工具这里的 Initial connection 时间应该是包含了 SSL 时间(即 SSL 握手时间),如果没有 SSL 的话,Initial connection 应该就是指普通的 TCP 三次握手。
https 连接建立时间包括:tcp 连接建立时间 + tls 连接建立时间。参考 为什么 HTTPS 需要 7 次握手以及 9 倍时延。
连接建立之后的后续访问,由于不需要再进行握手,所以快了很多:
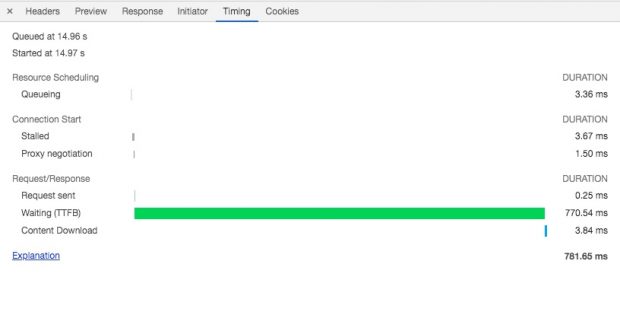
但这个初次建立连接的时间确实太长了,如何才能减少这个握手时间呢。
2. 升级 nginx
检查了一下服务器的 nginx 版本,发现是 1.12 的,现在的最新版本应该是 1.18 了。也没考虑太多,顺手就是一个 yum upgrade,然后就把 nginx 升级到版本 1.16.1。再进行一次测试,发现 https 握手时间只需要 350ms 左右了,以为这样差不多稳了。
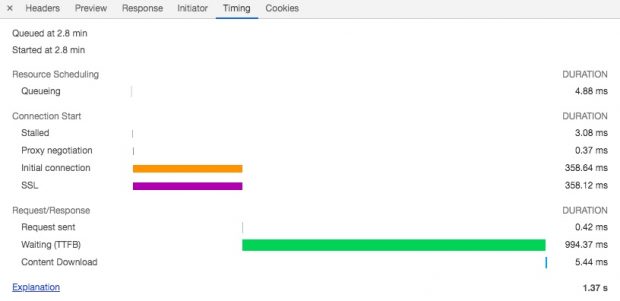
但是第二天再测试时候,却发现一个奇怪的现象。如果重启浏览器后的初次访问,https 的握手时间还是很耗时,依然需要3到4秒。之后如果不重启浏览器,而是重启 nginx 服务,然后再次访问,此时浏览器与服务器之间的 tcp 连接应该已经中断了,需要重新握手。但这个第二次的握手却还是挺快的,只需要大概 350ms,跟前一天测试的一样。
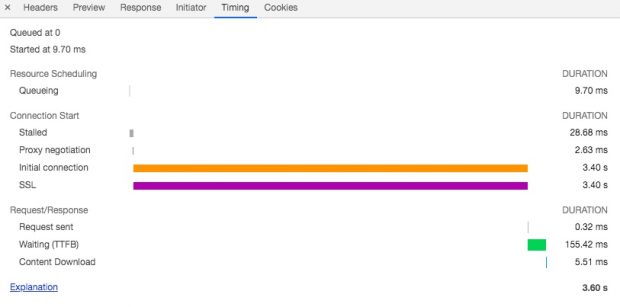
由于并不了解https握手的详细步骤,我还在猜想是不是由于客户端浏览器没有重启,有些状态是还保留在客户端的,所以再次握手的时候可以忽略客户端某些步骤,所以第二次握手会快一些。
后来在网络上搜索的时候,发现这一篇帖子《部署 Let’s Encrypt 的站点国内首次打开很慢?那是因为 OSCP 域名被墙了》。另外根据《HTTPs入门, 图解SSL从回车到握手》这篇文章的解释,握手中有一个阶段是客户端浏览器需要同步向证书颁发者验证证书吊销状态。如果Let’s Encrypt被墙的话,握手就会卡在这里。而后面再次握手的话,我猜由于浏览器没有重启,还记得这个证书的吊销状态,所以就跟正常情况是一样快的。
So,我尝试将 letsencrypt.org 域名加入翻墙软件的 pac 列表,然后多次重启浏览器进行连接测试。发现这时的 Initial connection 耗时都在 400ms 左右。即使有时候由于梯子的网络原因,会超过 1s,但怎么样也不会出现耗时 3s+ 的情况了。
所以。。。会出现这种https握手超过 3s 的情况,真他妈是墙的原因啊!连证书服务器都墙,简直丧心病狂。凸(-。-;
所以。。。我原来升级前的 nginx 1.12,应该并不是它导致的 https 连接慢,而是由于墙啊!算了,也亏了它,我才会去研究这些 https 提速的问题,才会写下这篇文章。我谢谢你啊 GFW
3. 再升级 nginx,开启 TLSv1.3
上面通过 yum 直接升级到的 nginx 版本信息如下:
nginx version: nginx/1.16.1
built by gcc 4.8.5 20150623 (Red Hat 4.8.5-39) (GCC)
built with OpenSSL 1.0.2k-fips 26 Jan 2017
TLS SNI support enabled
它是不支持 tlsv1.3 的。要想在 centos 7 中安装支持 tlsv1.3 的nginx,只能手工对 nginx 源码进行编译安装。网上有很多教程,我是参考的 这个脚本 进行手工安装的。
升级到的版本为:
nginx version: nginx/1.18.0
built by gcc 4.8.5 20150623 (Red Hat 4.8.5-39) (GCC)
built with OpenSSL 1.1.1g 21 Apr 2020
TLS SNI support enabled
需要注意的一点是,在 /lib/systemd/system/nginx.service 文件中,建议删除 PIDFile=/run/nginx.pid 这一行。否则你会在 systemctl status nginx 输出中看到这么一个报错信息:Failed to read PID from file /run/nginx.pid: Invalid argument,不过这条错误并不会影响 nginx 服务的启动,所以非强迫症患者可以不管它。
4. 测试工具
4.1 Chrome 开发者工具
通常,我们可以使用浏览器提供的开发者工具来进行网页载入时间的测试。比如上面那几张截图,都是来自 chrome 浏览器的开发者工具 — Network 面板 — Timing 标签页。
Queuing A request being queued indicates that:
- The request was postponed by the rendering engine because it’s considered lower priority than critical resources (such as scripts/styles). This often happens with images.
- The request was put on hold to wait for an unavailable TCP socket that’s about to free up.
- The request was put on hold because the browser only allows six TCP connections per origin on HTTP 1.
- Time spent making disk cache entries (typically very quick.)
Stalled/Blocking Time the request spent waiting before it could be sent. It can be waiting for any of the reasons described for Queueing. Additionally, this time is inclusive of any time spent in proxy negotiation.
Proxy Negotiation Time spent negotiating with a proxy server connection.
DNS Lookup Time spent performing the DNS lookup. Every new domain on a page requires a full roundtrip to do the DNS lookup.
Initial Connection / Connecting Time it took to establish a connection, including TCP handshakes/retries and negotiating a SSL.
我感觉 chrome 的这个 initial connection 时间并不准确。因为如果真是连接建立时间,那就应该包括 tcp 的三次握手时间(1~1.5个 RTT),加上 ssl 握手时间(根据 tls 版本的不同,可能需要 1~2个 RTT)。那么 timing 标签页中的这个 initial connection 计时条的长度应该是下面 ssl 计时条的至少 1.5 倍。但从实际结果来看,它们两的长度很接近,甚至近乎相等了。你这是当 tcp 握手不需要时间的吗?我不信!(¬_¬)
SSL Time spent completing a SSL handshake.
Request Sent / Sending Time spent issuing the network request. Typically a fraction of a millisecond.
Waiting (TTFB) Time spent waiting for the initial response, also known as the Time To First Byte. This time captures the latency of a round trip to the server in addition to the time spent waiting for the server to deliver the response.
Content Download / Downloading Time spent receiving the response data.
但是有一个问题就是,如果我想测试的是网络连接时间(TCP 握手 与 SSL 握手),那么我就不得不每次测试都要重启浏览器。因为浏览器到服务端的网络连接是 keep-alive 的,连接建立后,在后续一段时间内是不需要重新连接的。所以我急需一个同样功能的测试工具,但是每次测试数据都是重新连接的。我找了一整天,最后莫名地在外网有个帖子说用 curl 可以输出连接时间。哇噻!
另外由于 GFW 的干扰,在客户端浏览器测试墙外网页的打开速度是极不稳定的。即使用了梯子,现在撞上两会的开会时间,加上马上就六月了,所以梯子也不稳定。在我的电脑测出来的速度,有时候在 1s 内,有时候又飙到 10s+。所以最好是能在墙外的另一个节点上对墙外的 hawu.me 服务器进行测试。幸好我在墙外还有一台服务器,不过也是没有图形界面的 CentOS。万幸 curl 本来就是命令行模式。✧*。٩(ˊᗜˋ*)و✧*。
4.2 curl
curl 命令参数的详细文档参考 manpage。
4.2.1 基本用法
(1) 新建一个文本文件 curl-format.txt,内容如下:
             scheme:  %{scheme}\n
          http_code:  %{http_code}\n
       http_version:  http/%{http_version}\n
             remote:  %{remote_ip}:%{remote_port}\n
              local:  %{local_ip}:%{local_port}\n
  ssl_verify_result:  %{ssl_verify_result}\n
--------------------------------------\n
    time_namelookup:  %{time_namelookup}s\n
       time_connect:  %{time_connect}s\n
    time_appconnect:  %{time_appconnect}s\n
   time_pretransfer:  %{time_pretransfer}s\n
 time_starttransfer:  %{time_starttransfer}s\n
                    ------------\n
      time_redirect:  %{time_redirect}s\n
         time_total:  %{time_total}s\n
               size:  %{size_download}bytes\n
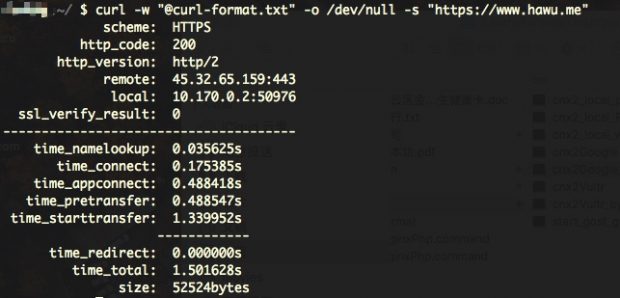
(2) 执行命令 curl -w “@curl-format.txt” -o /dev/null -s “https://www.hawu.me” 。输出结果如下:
需要注意的是,curl 输出的 time_xxx 时间表示从请求开始到该事件完成的时间,而不是表示该事件自己的耗时。
time_namelookup The time, in seconds, it took from the start until the name resolving was completed.
time_connect The time, in seconds, it took from the start until the TCP connect to the remote host (or proxy) was completed.
time_appconnect The time, in seconds, it took from the start until the SSL/SSH/etc connect/handshake to the remote host was completed. (Added in 7.19.0)
所以 (time_appconnect – time_connect) 才是 ssl 握手时间。
time_pretransfer The time, in seconds, it took from the start until the file transfer was just about to begin. This includes all pre-transfer commands and negotiations that are specific to the particular protocol(s) involved.
time_starttransfer The time, in seconds, it took from the start until the first byte was just about to be transferred. This includes time_pretransfer and also the time the server needed to calculate the result.
time_redirect The time, in seconds, it took for all redirection steps including name lookup, connect, pretransfer and transfer before the final transaction was started. time_redirect shows the complete execution time for multiple redirections. (Added in 7.12.3)
time_redirect 时间与其他时间不一样,表示的是重定向开始到结束的时间,包括重定向期间的 name lookup, connect等。curl 需要加上 -L 参数才能支持重定向。
time_total The total time, in seconds, that the full operation lasted.
from curl manpage
4.2.2 其他参数
(1) 指定 crul 使用的 TLS 版本,默认情况下是自动选择 curl 本身与目标服务器共同支持的最高版本。要想强制指定 TLSv1.2 或者 TLSv1.3,可以通过如下几个参数:
- –tls-max 指定 tls 的最高版本
- –tlsv1.2 指定 tls 最低版本必须为 1.2
- –tlsv1.3 指定 tls 最低版本必须为 1.3
由于我已经更新了服务端的 nginx 并开启了 tlsv1.3,同时也更新了本地的 curl,支持 tlsv1.3。所以我可以通过:
curl -w “@curl-format.txt” -o /dev/null -s “https://www.hawu.me” –tls-max 1.2 指定 curl 使用 tlsv1.2 进行连接。
(2) -v, –verbose
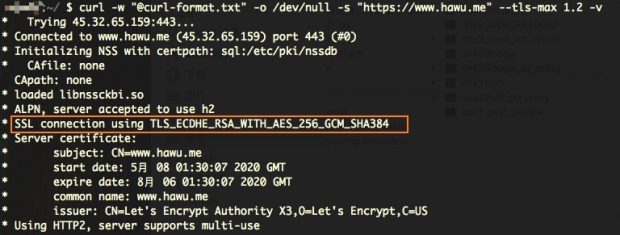
可以打印出连接的详细信息,包括使用的 TLS 版本。
这里输出的 TLS_ECDHE_RSA_WITH_AES_256_GCM_SHA384 就是 tlsv1.2 的一种密码套件(Cipher Suite)。
(3) -L, –location
表示让 curl 支持重定向跳转。不加这个参数的话,curl 默认是不处理重定向响应的。
(4) –resolve <host:port:addr[,addr]…>
直接指定 dns 查询结果,跳过 dns 查询过程。参数里的host应该是指domain才对。比如
--resolve www.hawu.me:443:45.32.65.159
4.3 curl 测试结果
我的个人博客是部署在 vultr 的洛杉矶节点,然后在 gcp 的香港节点进行 curl 测试。gcp hk 到 vultr la 的 ping 延迟大概稳定在 138ms 左右。
(1) nginx 1.18.0,openssl 1.1.1
tlsv1.2 握手结束时间大概都在 600ms 左右
tlsv1.3 握手结束时间大概都在 470ms 左右
(2) nginx 1.16.1, openssl 1.0.1
tlsv1.2 握手结束时间大概都在 600ms 左右
tisv1.3 不支持
结论:能确定 tlsv1.3 的连接速度确实有比 tlsv1.2 快,而且确实是大概快了一个 RTT 时间(一个 ping 包的时间就是一个 RTT)。
我还测试了在 vultr 本机进行 curl 测试。tlsv 1.2 与 tlsv1.3 的握手结束时间都在 170ms 左右,因为没有网络延时所以连接没啥差别。而这 170ms 应该都是进行加密解密计算消耗的时间吧, (\”▔□▔)汗,服务器 CPU 太差了。
本地是170ms,那么我们倒过来预估一下 gcp hk 节点的握手时间, 170ms 加上 tcp 三次握手的 1.5 个 RTT,再加上 tlsv1.3 握手的一个 RTT。另外 tls 握手应该不会等到 tcp 的第三次握手数据到达对方后才开始,所以扣除一点时间差,那么这么加上来大概就是 470ms 啦。
5. 优化 nginx 配置
DigitalOcean 出了一个可视化的 nginx 配置工具 nginxconfig.io,正好趁这次升级用了一下,还是很好用的。重要的是学到了一些以前没有用过的指令。
5.1 OCSP Stapling
nginxconfig.io 默认开启 OCSP Stapling。更详细的介绍可以参考文章《从无法开启 OCSP Stapling 说起,OCSP是什么》。
OCSP(Online Certificate Status Protocol,在线证书状态协议)是用来检验证书合法性的在线查询服务,一般由证书所属 CA 提供。某些客户端会在 TLS 握手阶段进一步协商时,实时查询 OCSP 接口,并在获得结果前阻塞后续流程。OCSP 查询本质是一次完整的 HTTP 请求 – 响应,这中间 DNS 查询、建立 TCP、服务端处理等环节都可能耗费很长时间,导致最终建立 TLS 连接时间变得更长。
而 OCSP Stapling(OCSP 封套),是指服务端主动获取 OCSP 查询结果并随着证书一起发送给客户端,从而让客户端跳过自己去验证的过程,提高 TLS 握手效率。
所以我一开始遇到的 https 握手时间超长,其实就是在这个 OCSP 查询证书吊销状态时候卡住了。
5.2 HSTS
nginxconfig.io 默认开启 HSTS (HTTP Strict Transport Security)。
add_header Strict-Transport-Security "max-age=31536000; includeSubDomains; preload" always;
有一点需要注意的是,即使在 nginx 配置中指定了 http://domain 到 https://domain 的 301 重定向,后续浏览器由于 HSTS 进行的重定向实际是 307 重定向,这是浏览器自行跳转的,而不经过服务器端。只有浏览器第一次访问,还没记住该域名的 HSTS 策略时才会是 301 重定向。
5.3 Content-Security-Policy
nginxconfig.io 默认开启 CSP。 它的作用是告诉浏览器允许加载哪些资源,以防止 XSS 攻击。
add_header Content-Security-Policy "default-src 'self' http: https: data: blob: 'unsafe-inline'" always;
CSP 的格式是:指令1 值 值; 指令2 值 。每个指令之间用分号隔开,指令与取值之间用空格隔开,一个指令允许多个值,有的值需要用单引号包裹。所以上面 nginxconfig.io 默认添加的 CSP 只包括一个 default-src 指令,后面的都是它的取值。
‘self‘ 是指允许加载同源的资源,所谓同源是指 URL 中 https://domain:port/ 这一段都必须相同,包括协议与端口号。如果只定义了 ‘self’ 的话,网页中引用的其他源地址的img、css、js等文件都是不允许加载的。
http: (还包括上面的 https: data: blob:)是指允许加载源地址为这些协议的资源。有了这几个值,那么比如像 <img src=”https://i.imgur.com/s0nEFzr.gif”> 这样的外链资源就是被允许加载的了。
‘unsafe-inline‘ 是指允许执行内嵌的 js 语句。比如 <button onclick=”alert(‘hello’)”>click me</button> 这句 alert()。如果没有定义允许 unsafe-inline,那么这句 alert 是不会被执行的,同时浏览器控制台会报错。直接放在 <script>…</script> 标签对中的 js 代码也是属于内嵌的。
‘unsafe-eval‘ 是指允许执行 eval,setTimeout 等等这些可以将字符串当作代码执行的函数。比如 console.log(eval(‘2 + 2’)); 这样。不幸的是,很多前端代码滥用的旧项目经常会用到 eval 函数,而 nginxconfig.io 默认是不允许执行 unsafe-eval 函数的。
5.4 访问控制
nginxconfig.io 默认拒绝访问以 . 开头的隐藏文件与目录,除了 .well-known 目录(这是 letsencrypt 申请与更新证书时候需要用到的目录,参考)。
# 拒绝访问所有以 . 开头的隐藏文件与目录,
# 除了 .well-known 目录(但是 .well-known/.file 还是不允许访问的)
location ~ /\.(?!well-known) {
  deny all;
}
除了 deny 指令,还有 allow 指令用来指定允许访问的 ip 来源。两者组合,就可以很方便的用来对某些关键 location 进行访问控制。
更多参考
TLS1.3 VS TLS1.2,让你明白TLS1.3的强大
 , Coding
  , and Thinking


深度好文,收藏了,后续也对自己的网站进行升级