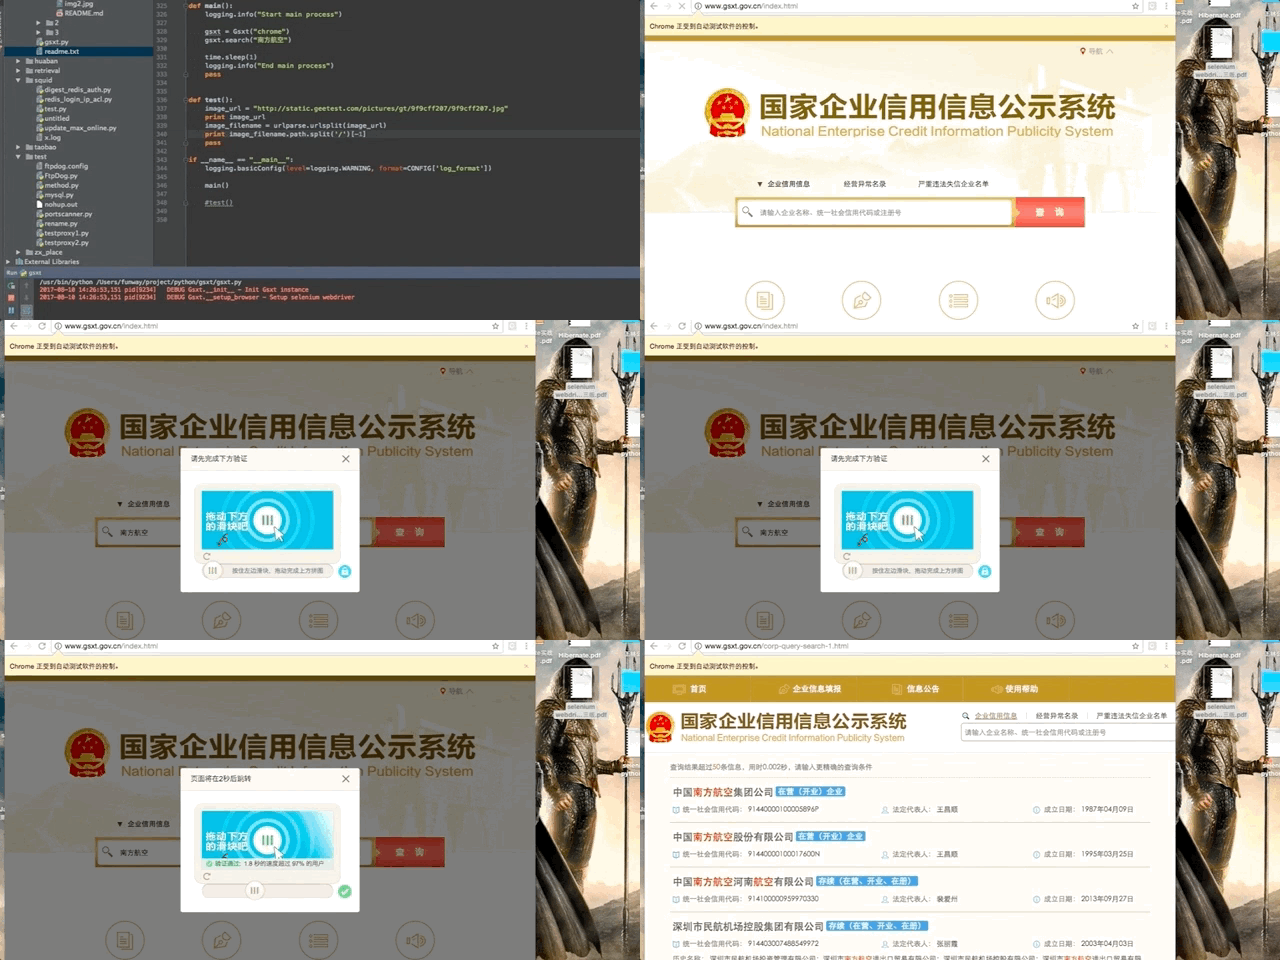
最近有个项目需要爬取“国家企业信用信息公示系统”的数据,在该网站点击搜索按钮时,会弹出极验(geetest)的拖动式验证码。
遂一番google之,发现果然有哥们已经破解了这套验证码系统,甚至放出源码来了。学以致用。
原理很简单,首先定位缺口的位置,然后驱动浏览器将按钮移动到该位置。至于如何定位缺口位置,其实这个验证图是分上下两张的,底图是完整图,上一层则是有缺口的图,另外这两张图都是打散的,需要先还原出原图,然后再逐像素对比两张图片就可以得到缺口位置。移动按钮看似简单,但如果只是简单的将按钮设置到目标位置,极验后台会返回“怪物吃了拼图”,因为该验证码系统会将按钮的移动轨迹提交到极验后台,并验证该轨迹是否像一个人类的行为,所以我们需要尽可能模拟出人类的拖动行为。
代码示例:
# -*- coding: utf-8 -*-
import logging
import time
import random
import re
import requests
import urlparse
from selenium import webdriver
from selenium.webdriver.common.action_chains import ActionChains
from PIL import Image
from io import BytesIO

"""
程序目的:
访问国家企业信用信息公示系统(http://www.gsxt.gov.cn/index.html),
输入查询关键字,
破解弹出的极验验证码系统(geetest)并搜索,最后获取搜索结果。
"""

VERSION = "1.0"
CONFIG = {
    'log_format': "%(asctime)s pid[%(process)d] %(levelname)7s %(name)s.%(funcName)s - %(message)s",
    'save_temp_file': False, }


class Gsxt(object):
    """"""

    def __init__(self, driver):
        """构造函数"""
        super(Gsxt, self).__init__()

        self.logger = logging.getLogger(self.__class__.__name__)
        self.logger.setLevel(logging.DEBUG)
        self.logger.debug("Init Gsxt instance")

        self.browser = None
        self.__setup_browser(driver)
        pass

    def __del__(self):
        """析构函数"""
        self.logger.debug("Del Gsxt instance")

        if self.browser is not None:
            self.browser.quit()
        pass

    def __setup_browser(self, driver):
        """装载浏览器驱动"""
        self.logger.debug("Setup selenium webdriver")

        driver = driver.lower()
        if "phantomjs" == driver:
            self.browser = webdriver.PhantomJS()
        elif "chrome" == driver:
            self.browser = webdriver.Chrome()
        elif "firefox" == driver:
            raise Exception("请不要使用firefox,因为geckodriver暂时有点功能不全!凸(-。-;")
        else:
            raise Exception("不识别的浏览器驱动")

        # 设置打开页面超时时间(但这对firefox的geckodriver 0.13.0版本无效,不知道后续改进没有)
        self.browser.set_page_load_timeout(8)

        # 设置查询dom的隐式等待时间(影响find_element_xxx,find_elements_xxx)
        self.browser.implicitly_wait(10)

        pass

    def search(self, keyword):
        """
        Args:
            keyword: 要搜索的关键字
        Returns:
        """
        if type(keyword) is str:
            keyword = keyword.decode('utf-8')

        self.logger.debug(u"准备搜索: %s", keyword)

        # 打开搜索页面
        self.browser.get("http://www.gsxt.gov.cn/index.html")

        # 输入关键字
        dom_input_keyword = self.browser.find_element_by_id("keyword")
        dom_input_keyword.send_keys(keyword)
        time.sleep(random.uniform(0.3, 1.0))

        # 点击搜索按钮
        dom_btn_query = self.browser.find_element_by_id("btn_query")
        dom_btn_query.click()
        time.sleep(random.uniform(0.8, 1.5))

        flag_success = False
        while not flag_success:
            # 下载完整的验证图
            image_full_bg = self.get_image("gt_cut_fullbg_slice")
            # 下载有缺口的验证图
            image_bg = self.get_image("gt_cut_bg_slice")

            # 对比两张验证图,获得缺口的位置(x_offset)
            diff_x = self.get_diff_x(image_full_bg, image_bg)
            self.logger.debug(u"缺口位置x_offset = %s", diff_x)

            # 根据缺口位置计算移动轨迹
            track = self.get_track(diff_x)

            # 移动滑块
            result = self.simulate_drag(track)

            # 判断滑动验证的结果
            if u"通过" in result:
                flag_success = True
                pass
            elif u"吃" in result:
                self.logger.debug(u"准备重试")
                time.sleep(5)
                pass
            else:
                self.logger.warn(u"未知结果")
                break
            pass

        # 获取搜索结果
        if flag_success:
            time.sleep(random.uniform(0.8, 1.5))
            # do sth
            pass

        pass

    def get_image(self, class_name):
        """
        下载并还原极验的验证图
        Args:
            class_name: 验证图所在的html标签的class name
        Returns:
            返回验证图
        Errors:
            IndexError: list index out of range. ajax超时未加载完成,导致image_slices为空
        """
        self.logger.debug(u"获取验证图像: class='%s'", class_name)

        image_slices = self.browser.find_elements_by_class_name(class_name)
        if len(image_slices) == 0:
            self.logger.warn(u"无法找到class='%s'的标签", class_name)

        div_style = image_slices[0].get_attribute('style')
        self.logger.debug(u"div style=%s", div_style)

        # 获取图像url
        image_url = re.findall("background-image: url\(\"(.*)\"\); background-position: (.*)px (.*)px;",
                               div_style)[0][0]
        # chrome浏览器得到的验证图是webp格式,其他浏览器都是jpg格式。
        image_url = image_url.replace("webp", "jpg")
        self.logger.debug(u"验证图像url: %s", image_url)
        image_filename = urlparse.urlsplit(image_url).path.split('/')[-1]

        # 获取图像的每个切片位置
        location_list = list()
        for image_slice in image_slices:
            location = dict()
            location['x'] = int(re.findall("background-image: url\(\"(.*)\"\); background-position: (.*)px (.*)px;",
                                           image_slice.get_attribute('style'))[0][1])
            location['y'] = int(re.findall("background-image: url\(\"(.*)\"\); background-position: (.*)px (.*)px;",
                                           image_slice.get_attribute('style'))[0][2])
            self.logger.debug(location)
            location_list.append(location)

        # 通过request请求获取验证图
        headers = {"Host": "static.geetest.com",
                   "User-Agent": "Mozilla/5.0 (Windows NT 6.1; WOW64) AppleWebKit/537.36 (KHTML, like Gecko) Chrome/56.0.2924.87 Safari/537.36"}
        response = requests.get(image_url, headers=headers)

        # 构造Image类型的验证图
        image = Image.open(BytesIO(response.content))
        if CONFIG['save_temp_file']:
            self.logger.debug(u"保存验证图像(原图): %s", image_filename)
            image.save(image_filename)

        # 还原验证图
        image = self.recover_image(image, location_list)
        if CONFIG['save_temp_file']:
            self.logger.debug(u"保存验证图像(复原图): %s", "re_"+image_filename)
            image.save("re_" + image_filename)

        return image

    def recover_image(self, image, location_list):
        """
        还原验证图像
        Args:
            image: 打乱的验证图像(PIL.Image数据类型)
            location_list: 验证图像每个碎片的位置
        Returns:
           还原过后的图像
        """
        self.logger.debug(u"开始还原验证图像...")
        new_im = Image.new('RGB', (260, 116))
        im_list_upper = []
        im_list_down = []

        for location in location_list:
            if location['y'] == -58:
                im_list_upper.append(image.crop((abs(location['x']), 58, abs(location['x']) + 10, 166)))
            if location['y'] == 0:
                im_list_down.append(image.crop((abs(location['x']), 0, abs(location['x']) + 10, 58)))

        x_offset = 0
        for im in im_list_upper:
            new_im.paste(im, (x_offset, 0))
            x_offset += im.size[0]

        x_offset = 0
        for im in im_list_down:
            new_im.paste(im, (x_offset, 58))
            x_offset += im.size[0]

        return new_im

    def get_diff_x(self, image1, image2):
        """
        计算验证图的缺口位置(x轴)
        两张原始图的大小都是相同的260*116,那就通过两个for循环依次对比每个像素点的RGB值,
        如果RGB三元素中有一个相差超过50则就认为找到了缺口的位置
        Args:
            image1: 图像1
            image2: 图像2
        Returns:
            x_offset
        """
        for x in range(0, 260):
            for y in range(0, 116):
                if not self.__is_similar(image1, image2, x, y):
                    return x

    def __is_similar(self, image1, image2, x_offset, y_offset):
        """
        判断image1, image2的[x, y]这一像素是否相似,如果该像素的RGB值相差都在50以内,则认为相似。
        Args:
            image1: 图像1
            image2: 图像2
            x_offset: x坐标
            y_offset: y坐标
        Returns:
           boolean
        """
        pixel1 = image1.getpixel((x_offset, y_offset))
        pixel2 = image2.getpixel((x_offset, y_offset))

        for i in range(0, 3):
            if abs(pixel1[i] - pixel2[i]) >= 50:
                return False
        return True

    def get_track(self, x_offset):
        """
        根据缺口位置x_offset,仿照手动拖动滑块时的移动轨迹。
        手动拖动滑块有几个特点:
            开始时拖动速度快,最后接近目标时会慢下来;
            总时间大概1~3秒;
        但是现在这个简单的模拟轨迹成功率并不高,只能说能用。我并不懂关于机器学习的知识,但我想如果能用上的话应该会好一些
        Args:
            x_offset: 验证图像的缺口位置,亦即滑块的目标地址
        Returns:
            返回一个轨迹数组,数组中的每个轨迹都是[x,y,z]三元素:x代表横向位移,y代表竖向位移,z代表时间间隔
            [[x1,y1,z1], [x2,y2,z2], ...]
        """
        track = list()

        # 实际上滑块的起始位置并不是在图像的最左边,而是大概有6个像素的距离,所以滑动距离要减掉这个长度
        length = x_offset - 6
        total_time = 0

        x = random.randint(1, 3)
        while length - x >= 5:
            track.append([x, 0, 0])
            length = length - x
            x = random.randint(1, 3)
            total_time += track[-1][2]

        for i in range(length):
            track.append([1, 0, random.randint(10, 20)/100.0])
            total_time += track[-1][2]

        self.logger.debug(u"计算出移动轨迹; %s", track)
        self.logger.debug(u"预计耗时: %s", total_time)
        return track

    def simulate_drag(self, track):
        """
        根据移动轨迹,模拟拖动极验的验证滑块
        Args:
            track: 移动轨迹
        Returns:

        """
        self.logger.debug(u"开始模拟拖动滑块")

        # 获得滑块元素
        dom_div_slider = self.browser.find_element_by_class_name("gt_slider_knob")
        self.logger.debug(u"滑块初始位置: %s", dom_div_slider.location)

        ActionChains(self.browser).click_and_hold(on_element=dom_div_slider).perform()

        for x, y, z in track:
            self.logger.debug(u"位移: (%s, %s), 等待%s秒", x, y, z)
            ActionChains(self.browser).move_to_element_with_offset(
                to_element=dom_div_slider,
                xoffset=x+22,
                yoffset=y+22).perform()
            self.logger.debug(u"滑块当前位置: %s", dom_div_slider.location)
            time.sleep(z)
            pass

        time.sleep(0.2)
        ActionChains(self.browser).release(on_element=dom_div_slider).perform()

        time.sleep(1)
        dom_div_gt_info = self.browser.find_element_by_class_name("gt_info_text")
        self.logger.debug(u"拖动结果【%s】", dom_div_gt_info.text)
        return dom_div_gt_info.text


def main():
    logging.info("Start main process")

    gsxt = Gsxt("chrome")
    gsxt.search("南方航空")

    time.sleep(1)
    logging.info("End main process")
    pass


def test():
    image_url = "http://static.geetest.com/pictures/gt/9f9cff207/9f9cff207.jpg"
    print image_url
    image_filename = urlparse.urlsplit(image_url)
    print image_filename.path.split('/')[-1]
    pass

if __name__ == "__main__":
    logging.basicConfig(level=logging.WARNING, format=CONFIG['log_format'])

    main()

    #test()
参考:

